Tuesday, October 15, 2013

Wingback chair makeover part 3

Progress has been slow, very slow!  I only have one upholstery lesson left and I'm only about 1/3 of the way finished.  If I was doing it all by myself at home I'd have had it finished ages ago, but the instructor is showing me the proper way to do things and that takes time.

The following steps took 3 lessons to do.

After you've stripped everything off your chair, it's time to put it all back again!  You can reuse batting and foam if it is in good condition, but because of the age of my chair, I chose to use all new materials.

Lay out all of the pieces of fabric that you took off the chair and use them as guides to cut out the new.  Don't forget to include seam allowances.  You can cut around the pieces that will be sewn, such as the seat cushion and arms.  However, the pieces that will be upholstered (the ones that were stapled on) you will need to add a couple of inches extra to be able to pull the fabric through and staple it onto the frame (these original pieces will have been trimmed once they were stapled on, so don't rely on cutting these to size from the templates).


If you want your designs to line up then you have to be clever about how you cut these pieces out.

After all of your pieces have been cut out, including any long pieces for piping, it's time to reupholster!

Start by putting batting over the front bottom of the chair.


Make sure not to stretch it too much so as to keep the loft even.

Next, sew the decking (the plain fabric) to the fabric that will cover this batting.  My front part is curved around so it was necessary to make some pleats in the fabric.  The pleats were sewn by my ever patient instructor.


Staple the decking and front piece onto the frame.  Don't staple around the legs yet.


The next step is to make the cushion cover. 

You want the top of the cushion to be exactly the same size as the bottom.  Also make sure that it is symmetrical, so don't necessarily rely on the old piece of fabric, just use this as a guide.

No need to pre-sew your piping, just sew the piping onto the seat cushion in one go.  Make sure to pull the seat fabric taught so that you don't get any fullness (like I did in a number of places!).  Remember, you want both of the seat sides to be exactly the same size after you have sewn the piping on (easier said than done).  It also helps to snip the fabric on the piping at the corners.


Once you have the top and bottom of the seat cushion cover sewn with piping, the next step is to make the zipper.


Once that is done, you can sew the zipper to the side section and sew this on to one of the cushion pieces.

my instructor's hands, not mine!
Once you get all the way around the cushion, make a flap with the extra material to cover the zipper and sew in to place.

Turn your cover inside out and sew it to the other side.  Hopefully your pieces will meet up perfectly!


This is the finished cover with the old insert.  I'll cut new foam and batting which will take care of the bunching at the front.


I decided not to have my patterns meet up because I didn't have enough fabric to be able to play with the design.  I don't think it detracts from the upholstery job but I'm sure that there are professionals out there that would disagree.


I think it's going to look great, if I ever finish this thing!  I only have one session left, and unfortunately the boys have a gig that night so I will probably be only able to go for 1/2 hour.  I can take the chair home and do it myself, otherwise I have to wait until the next classes start in January!

To see the other posts in this series go to Part 1 and Part 2.

Thursday, October 10, 2013

Entryway Update

Just a couple of small updates to share with you regarding our entryway/vestibule.

Here's the before:


I've had probably 4 or 5 different rugs in this area since we bought our house.  This latest one is from Sundance Catalog and is a patchwork of different kilim rugs.  What I like about it for the entryway is that it is quite heavy weight so it stays put without a rug pad.  It also hides the dirt and doesn't look dirty even if you wipe muddy shoes on it.  The mud dries and you simply vacuum it up.

Here's the after:


New light fixture from West Elm.  It's not my favourite, but it was less than $70 and works a lot better than the previous one.  If we were going to stay in the house for longer I'd probably go with something a lot fancier and showy.  I also bought a new boot tray from Target which is copper metal (also an upgrade from the plastic tray that was there before).

To see how I made the curtains go here.


And finally, aren't you impressed with my photoshop skills?  I managed to make it so that you can see the outside through the window in the door.  Yeah, kind of looks a bit fake to me too :/

Tuesday, October 8, 2013

Teen Dreams Mood Board - One King's Lane

Do you ever shop on One King's Lane?  I don't think I've ever bought anything from there, but I was drawn to a current sale that they have on.  It's called Teen Dreams and it features some rather pretty bedroom furniture for tweens and teens, and let's face it, about any-aged girly girl.

I decided to put together a mood board of my favourite finds.  It all started with the glorious rose wingback bed, and was built up from there.


Here's a break-down of the items going clockwise from the top-left.

Naples white chandelier - $109
Picture, Laura, Michelle Armas - $189 (x2)
Chain link table lamp, orange - $279 (x2)
Marina octagonal table, gray/white - $249
Sophia wingback bed, rose - $799
Palmer ottoman - $199 (x2)
Light-up XOXO sign - $279
Picture, Stamped Lips, Andy Warhol - $129
Darmin table lamp, gold - $229
Harper dresser, white - $649
Alba X leg desk, white - $629
Crawford skirted chair - linen sea foam - $349
Amalia mirror, white - $299
Ikat pillow, green - $35
Anika pillow, orange/pink - $69
Alex carved side table - $289
Bacall armless settee, coral - $589

Sale ends in less than 3 days!


Monday, October 7, 2013

DIY Anthropologie Style Curtains - Ikea Hack

If you've ever shopped for curtains at Anthropologie, you'll know how expensive they can be. Not only that but you're also limited to the standard lengths with a max of 108 inches. I wanted the curtains for the music room to be floor to ceiling length.  My ceilings are 10 feet tall so that pretty much meant that I would need to get custom curtains.  Fortunately I found out that Ikea sell a very inexpensive white curtain called Ritva, that almost looks like linen and is 118 inches long.  They are also only $34.99 for a pair!  Perfect.


Except it wasn't perfect.  Knowing how much cotton shrinks when you wash it, I decided to preshrink my curtains before hanging them so that I knew exactly where to hang the rod.  And boy, did those curtains shrink.  And not only that, but they also shrank to different lengths!  (I bought these curtains over a year ago, and recently bought another pair to use in the hallway.  The newer pair have not shrunk as much and they are also finished on the bottom unlike the older ones).

Another bonus of these curtains is they also have a built in tape at the top which allows you to make the pleats with curtain hooks (which is a much nice look than the simple rod pockets that most curtains come with).


So I hung the curtains and tried to ignore the fact that some puddled on the floor while others were 3 inches above it!  They're also kind of flimsy so they didn't drape that nicely either.  A chance purchase of a huge quilt on sale for only $70 from Sundance Catalog set the wheels in motion for a bit of customization to said curtains.


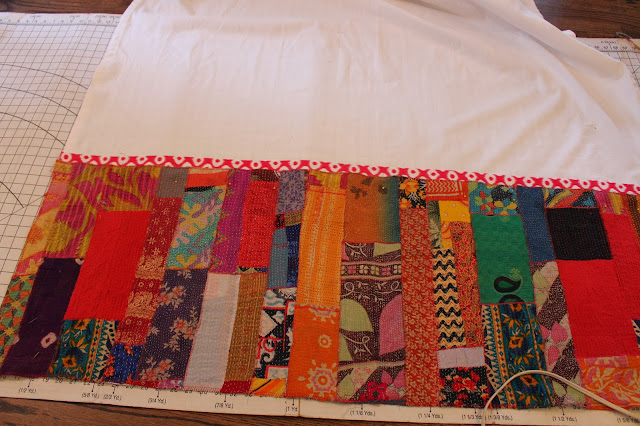
The first thing I did was decide how much of the patchwork quilt I wanted to attach to the bottom of each curtain.  I chose to use the bottom of the glass pane in the window to be my guide.


I then measured the desired height and used painters tape because I didn't have any chalk or a ruler long enough.  


I though about leaving it as is with just the quilt, but decided that it didn't look finished.


So then came the task of deciding what type of piping or detail to use.


I really liked the green geometric fabric, but it only came in 45 inch width.  I would either have to turn it around so that the pattern was not the diamond shape that I liked (see below), or I'd have to join 2 pieces together which would create a seam.


Once I had decided on the trim I dusted off the old sewing machine and got to work.


Fortunately the quilt, which incidentally is made from saris, is sewn together quite roughly so my bad sewing skills can be disguised.  I simply sewed the patchwork onto curtain making sure that the finished length of the curtain was the desired length (skimming the floor).


I then cut out the trim piece, folded it in half and ironed it.


The final step was to sew all the layers together using a straight stitch.


The trim is only sewn down one side so it is like a flap.


I feel a bit guilty chopping up the quilt because it states on the Sundance Catalog website that each quilt takes 6 months to make!  But I think that the curtains came out beautifully.

Here's a break down of the cost of the curtains (per panel).

Curtain Ikea $17.49
Quilt (divided by 6) $11
Trim $1
Grand Total of $29.49.

And I still have quite a bit of the quilt left that I can either make a small throw blanket or a couple of pillows.

Wednesday, October 2, 2013

Project Sneak Peek

Here's a little sneak peek of a DIY project that I've been working on.


Reveal Friday (I hope)!