Showing posts with label kitchen. Show all posts

Sunday, February 15, 2015

Adding some marble to the kitchen

When I redid my kitchen 12 years ago I debated between soapstone countertops or granite counter tops.  Marble was unheard of, especially in Utah.  Now you can't open a magazine or interior blog without being confronted by glorious, magnificent marble kitchens!  What's a girl to do?  Well I could rip out my perfectly good granite countertops and replace them with marble, but I don't think I'll be staying here long so I really can't justify the expense.  So instead I've managed to introduce some marble into the kitchen by adding some accessories.


The first thing I added was a marble slap from here.  Its a great size, not too big that it's difficult to clean and move, and not too small that you can't roll out pastry for a pie!

I also ordered a marble paper towel holder.

I was amazed that both items arrived the next day.  And I didn't have to haul them back from the shops.

The french marble utensil holder I picked up from Crate and Barrel.


The cake stand is from Williams Sonoma and usually has bananas or some other fruit on it.  Incidentally, the stand that I picked up from the store is different from the one shown online.  I actually prefer the one in the store.  You can't see it very well from this picture, but it has a lovely carved wood base and a subtly veined marble top.


The last marble accessory I added was a French Kitchen Marble Fruit Bowl again from Crate and Barrel.

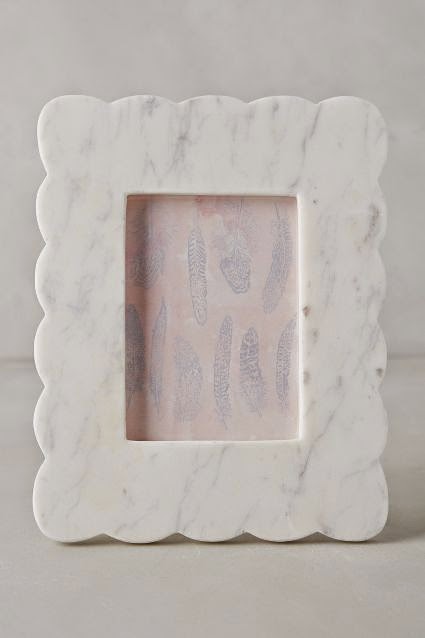
At this point I seem to be going marble crazy.  I even bought a marble picture frame from Anthropologie to go on the wall above the sink.


But it was way too small, so it went back.

Next I ordered a marble shelf from CB2.


I didn't like the look of the brackets, so I bought some wishbone brackets from Anthropologie.


But the marble is heavy!  And I didn't really want to risk it crashing down and potentially taking out my faucet, my sink, or my granite (although that would be a good excuse to replace it!).

So instead I ended up with this pretty mirror from Sundance Catalog.


It does a great job of filling that awkward space, as well as reflecting some light back in to the kitchen.


I bought this kilim rug from a seller on Ebay.  It's really long, so I'm planning on cutting it down and using the left over piece to reupholster the window seat cushion.  Well, that's the plan anyway.

Finally, you thought I was done with the marble, didn't you?  Well, although I'm not quite prepared to shell out $3000 for new countertops for the cabinets, I did decide to buy a remnant piece of marble for the island!  I'm super excited; it arrives on Thursday.  I decided to make it larger than the island so that the stools would fit underneath.  I hope it looks good and doesn't crowd the kitchen too much. I'll post pictures soon.

Tuesday, May 13, 2014

Kitchen Prettiness

As the weather finally warms up, it's so nice to be able to bring some colorful spring blooms into the house.  Here's some pretty pictures of the flowers that I currently have in my kitchen.


The orchid was a gift from a friend over 2 months ago.  It's doing remarkably well.  I make sure that I only water it a tiny amount once a week.


The hydrangea I bought from Trader Joe's on Saturday.  You have to water it everyday or it will wilt.


The flowers above were part of a tablescape that I did for a dinner we hosted.


The red roses were a Mother's Day gift from my lovely boys.


I'm thinking about putting a shaped mirror above the sink.  It's looking a little bare.  Of course if I was to do the kitchen over again, I would have a full on marble backsplash and counters.  I've been toying with doing a simple subway tile, we'll see.

'

I love the view from the kitchen through to the bookshelves in the music room.  It's so bright and cheery with all of the different colored spines.


Hope you enjoyed this mini tour of my kitchen!

Monday, May 5, 2014

DIY Tufted Banquette Tutorial

Here's how I made the banquette in 11 easyish steps!  I wouldn't say it was super easy, but it is doable, if you have the patience for it.  For the cushion part, I mostly followed the tutorial done by Jenny from Little Green Notebook.

Step 1- Build your base

I needed a base for my banquette.  I didn't want to bother with building or framing it from scratch so I bought 3 Ikea Besta shelf units for $150 total.  They're also pretty light weight, so I can move the banquette and clean under it easily.


They're not very deep, and I wanted to have enough space to sit comfortably so I made the cushion seat deeper by 3 inches.  The cushion base and seat overhang at the back.  This also allows me to still plug things into the wall sockets that are now behind the banquette.

Step 2 - Chose your cushion base

I decided to use 2' x 4' white pegboard panels for the cushions.  I bought 6 of these for a total of $41.70.  I had Home Depot cut them to size.  These pegboard panels also come in 8' lengths, but they're made out of a thinner and flimsier material.  Because I needed to span more than 4', I joined the pegboards with 2" double wide mending plates.


Step 3 - Cut your foam to size

The next step was to cut the foam to size.  You can buy foam over the internet cut to your specifications, but it is super expensive.  JoAnns and Hancock Fabrics sometime have good deals on their foam, but not as cheap as using camping pads, which is what I decided to go with. I really saved a bundle by using these.  They're 6' by 2' and cost $22 each.  I made sure I picked the firmest I could find.


The easiest way to cut foam is with an electric knife.  I used a long ruler as a guide.  It also helps to hold the knife blades from underneath with your other hand (make sure you're wearing gloves!).

Step 4 - Mark your tufts

Next, decide where you want your tufts to be.  This is where using pegboard comes in handy.


Mark the holes before hand.  Place the marked pegboard on the foam.  Use a marker to create dots on the foam.

Step 5 - Make holes in foam

You then remove some of the foam where the dots are.  I used a hollow end of a broom.  Simply punch it through the foam and remove the cutout foam.


Step 6 - Batting

Next you'll want to glue the foam to the pegboard with spray glue, and cover it with some batting for extra cushiness.  Staple the batting to keep it in place.


Step 7 - Make your fabric covered buttons

Make your buttons.  This is where the project starts to get tedious, and frustrating.  In all, I used 172 buttons!  I bought all of the buttons on sale so they only cost me about 30 cents each, approximately $50 total.


This is where I almost lost it!  Thankfully, I didn't cover all of my buttons at once, because after tufting a few, I realized that the backs would come off when I tried to tuft.  This happened on a number of occasions.  So I decided that I would glue all of the backs onto the buttons.  This was an extra step but so necessary.  I know upholstery shops will make you covered buttons for $1 each which is great if you're only doing a few, but not a couple of hundred.


Step 8 - Measure and cut your fabric

Next stage is to cut your fabric.  Make sure you have enough fabric on either side of the foam to be able to tuft into the holes.

Step 9 - Tuft

Start tufting.  There's definitely a bit of a skill to this, and it wasn't as easy as I thought it would be.  I think it was a lot harder for me because I was tufting such long pieces.  I started in the middle and worked my way out.


You'll want to guide the fabric into diamonds with your hands.


To secure the buttons you can either use a staple method, or a button method.  The staple method was difficult because I was using a stapler that didn't have much power, so the staples weren't sitting as tight as I'd like to hold the cotton.  Definitely make sure you use upholstery thread for your buttons.  Pull the thread tight and staple in a zig zag fashion.


My hand started to hurt after a while of doing these, so I switched it up and decided to use some buttons instead of staples.  Use a slip knot to pull the buttons tight.  You probably wouldn't want to use buttons on the seat cushion because they might break when you sat on them, but for the seat back, this method could work fine.


Step 10 - Staple fabric on back

Then turn your cushion over and staple the fabric, making sure you pull it tight.


Step 11 - Make banquette skirt

Next step, the skirt.  I wanted a tailored skirt that could be easily pulled up to access the storage in the bench.

I made some piping, and cut the panels.  I ironed a 2 inch seam on either side of the panels.


The panels were then stapled to the underside of the seat cushion.


Project cost:

Base cabinets - Ikea Besta - $150
Foam pads - $120
Buttons - Dritz - $55
Peg board - $40
Mending plates - $7
Fabric - Warsa Lime Linen, Gray Lines Linen Inc 14 yds - $140
Batting - 4 yds - $20
Upholstery Thread - $3

Grand Total - $535!  

Project time:

Too many hours to count!

Wednesday, April 30, 2014

DIY kitchen banquette reveal

Finally, the reveal.

The banquette took a lot longer than expected and there were a few bumps along the way, but I'm pleased to say it's finally finished!  We've actually been enjoying sitting on it for a few weeks now, and I can tell you, it is mighty comfy.

Here's some pictures without the table in front.  The material is linen, so that is why it looks creased.  I've ironed and starched it, but nothing will make the creases come out.  I'm learning to live with it!  Plus the table should hide the skirt on the most part.


Here's the banquette with the table.  Of course the table does not go with the style of the banquette, it's way too country, hence the addition of the table cloth.


The tufts aren't all perfect, and that little bit drove me crazy!  I spent many restless nights wondering if it actually looked like this:


No offense if this is your bed design, but this picture did make me laugh.


I'm a little paranoid about the boys spilling something on it, but I scotch guarded it and keep a bottle of stain remover handy for those inevitable spills.  So far so good.

I'll post a tutorial and price breakdown later in the week.