Finally started working on the office chair. I didn't want anything that screamed work space, so I decided to reuse an old chair that was originally in the bathroom.
The chair wasn't quite so hideous when I bought it, but a rash decision to wash the slipcover in the washing machine sealed its fate. It's kinda looking very grannyfied, definitely not the look I'm going for, but it is super comfortable, and not at all bad looking when you remove the cover.
I probably could have left it like that and maybe painted zigzags on it, but I'm not sure about the look of painted fabric. So with pliers in hand, I removed the padded leg covers and discovered this lovely layered wood. It did look kind of interesting and cool and for a little while I considered just polyurethaning the legs instead of painting them, but the wood was badly nicked and rough, so out came the paint can.
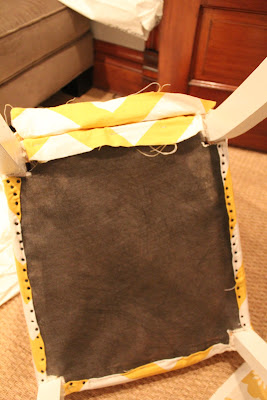
Next step, cut fabric to size and staple, staple, staple. I chose to use yellow zippy fabric from Premier Fabrics for the seat and front, and Thomaspaul aviary fabric for the back.
I was almost done, and then I came up with the bright idea of using some bias piping on the back. I already had some in orange, but thought it might also look good in yellow, white or even blue. So instead of having the chair finished, I now have to traipse off to JoAnns to get some more piping. Hope I'm able to make a decision soon.


Do you know where you originally bought the chair?? We're redoing our office space and I'm copying what your finished product looks like (zig zag fabric, etc) and would really love to have that chair!! (Thanks to Pinterest, I found your blog!) Great job on reupholstering it and making it look professionally done!!
ReplyDeleteHeather, I bought the chair used at a consignment store years ago. But you can buy similar chairs at Ballard Designs, Z gallerie, HomeGoods etc and I think they even may have them at Ikea. It's called a Parson's chair.
ReplyDeleteGood luck with the chair. Don't you just love Pinterest?
I just entered the chair and my office in the Room for Color Contest on Apartment Therapy. If you like it, you can favorite it by going here
http://community.apartmenttherapy.com/contests/color/2011/entries/3559
You have to sign up for an account, but they don't spam you or sell your email.
Thanks, and send me a picture of your finished chair. I'd love to see it!
Ok, the office remodel is officially done and the chair looks pretty good for a first timer ;) Thank you for your help finding a parsons chair. My mother in law found a steal at JC Penney's for 2 leather chairs discounted from $279 for the 2, down to $79.99!! Score!! You can see the big reveal on my blog at crooksclan dot com.
ReplyDeleteHeather, the chair looks fabulous. And congrats on getting a great deal! I'm so happy to have been an inspiration.
ReplyDeleteLove the chair - great work! For the back fabric, did you just fold over the edges before stapling or securing them to the chair?
ReplyDeleteYes, I think, if I recall, that I just folded it over and used fabric glue to secure it to the back. The nailheads also help to keep it in place. Glad you like the chair!
DeleteThank you!!!
DeleteDo you remember how much fabric you used for the chair?
ReplyDeleteVicky, I'm sorry I don't remember exactly but I don't think it was more than 2 yards.
DeleteIm a little confused, how did you add the piping?
ReplyDeleteI glued the piping on with fabric glue, then I glued the back piece (floral) of fabric on top. The nails are merely decorative.
DeleteI'm so happy I found your tutorial the chair is AMAZING!!! I have been wanting to redo my parsons chairs for a while now but havent been able to find a good no-sew version...until now! I do have one question though, how did you get through the space between the back part of the seat and bottom of the back? Looks like you got through there in your pictures. This is the one thing holding me up.
ReplyDeleteAbsolutely gorgeous chair, well done!
Yes, i was able to pull the fabric taught through the back of the chair. I think I undid the fabric underneath at the back (don't know what you call it, dust fabric or something like that), and was able to pull the fabric through that way. I then refastened everything. Hope it helps!
DeleteHi I'm about to do a project like this but I'm not very adept at upholstery. any tips to make it look clean and professional? what kinds of tools/products did you use? what kind of staple bolts are those and what are they called? what kind of staple gun? thanks!!
ReplyDeleteWhere did you find the keyboard/ mouse pad? Is it leather? Thanks
ReplyDeleteIt's from Ikea. I don't think it's real leather.
Delete